Solving Business Challenges: Uploading Files to a Community from a Mobile Device
On a recent project, the ThirdEye team noticed that the standard Salesforce files component doesn’t actually allow users to upload files from a mobile device when using a Salesforce Community. So, we decided to build a Lightning Web component to get around this! The component was built to work alongside the standard Files Related List component that Salesforce has built.
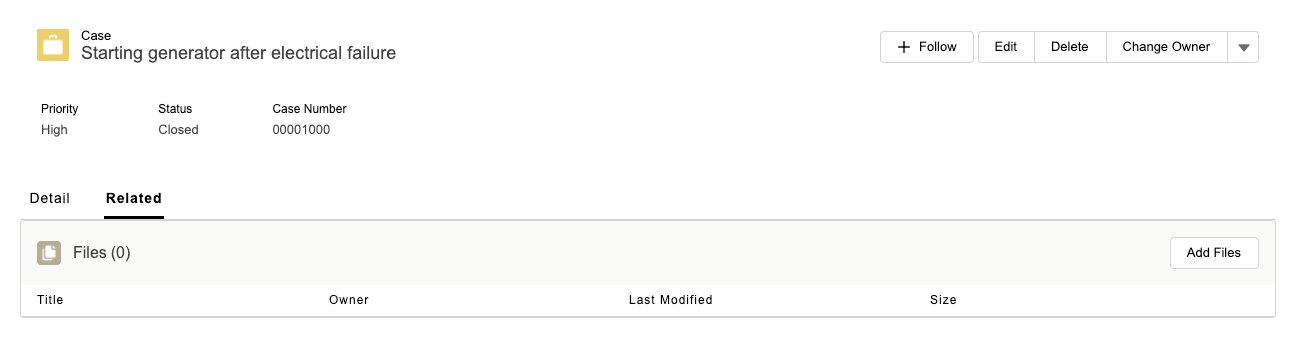
The reason we did this was due to the fact that while the standard Files Related List component works great on desktop and mobile, the issue is that it doesn’t allow file uploads from a mobile device. So, to get around this we implemented some logic in the component, so that it will only display on a mobile device and not on a desktop. This means when navigating through the Community, a user can always see the Files Related List component, as well as having the ability to upload files from their mobile.


Like all of our favourite solutions, this is now a completely reusable asset that will go into our Accelerator library, allowing us to bring fast value to all of our future clients. Do your customers want to share documents in your community? Get in touch today!
Read More
Solving Business Challenges: Einstein Bots
The solution:
If customers weren’t going to go after the articles, we had to bring the articles to them. To make this happen, we implemented an online chat solution that leveraged Einstein Bots:
- The first thing we did was an analysis of the most common issues customers faced that led them to opening support cases, and mapped those to the article that had the answers. In some instances, we even broke down those articles to bring the reader right to the point of the issue.
- Following on from that, we combined those into topics and arranged them into a four-level deep tree structure. For example, one of the paths could be Account > Settings > Security > Reset Password.
- Once all of that was defined, we set up the chat functionality and added the Bot layer. We gave the Bot a personality that matched the company’s. When the customer opens the chat, the Bot greets them and presents a series of multiple choice questions. For example, it might ask whether their query is related to their account, equipment or services. If they choose Account, it prompts another quick question and so on. Once they got to Reset Password, the Bot answers their question with a snippet from the article that was previously mapped and also provides a direct link to the full article for more information.
- The Bot then asks whether the customer’s problem has been resolved or whether they want to go ahead and either speak to a support rep or open a case.
- Lastly, we removed the “Create a Case” shortcut from the landing page that was so tempting to click before searching for answers, and replaced it with the chat widget. Now the most intuitive option is to go to the chat window instead!
The result:
Customers are happy that they can find answers faster by being directed to the right Knowledge Article very quickly, rather than having to wait for a reply from the support team. The company saw a considerable reduction in repetitive cases, which in turn meant they needed fewer support reps. The more tech-savvy amongst them had their roles reshaped to work on continuously improving the Bot and reported higher job satisfaction. It’s a win-win all around and that’s what we are passionate about delivering here at ThirdEye!
Read More
Solving Business Challenges: Record Round Robin Assignment
The Basics
The process consists of a Launcher Flow and an Assignment Engine.
Launcher Flow

The Launcher Flow has one input variable, which is the ID of the record which needs to be assigned. The first component we will insert is a ‘Get Records’ component, which is used to store the pool of users we want to be in the assignment round robin.

For this specific example, the only filter we are using in our query is ‘IsActive = True’, but clients have had additional filters such as ‘Team__c = Team 1’. This will return an ‘sObject’ collection with all the users who will be candidate assignees. We can add a decision point to check whether any users were found.

The second step in our Launcher takes us into the actual Assignment Engine.

We are passing in the ‘sObject’ collection of our assignment pool as well as the ID of the record which needs to be assigned. The output of this is the ID of the assigned owner of the record.
The last part of the Launcher is the record update.

We are using the lead object, but any custom object which is not the detail of a Master-Detail relationship can be used, and this is the only component of the flow which needs to be changed to use a different object.
The Assignment Engine

Now for the best part. To randomise the process as much as possible, we will use the ID of the record we are about to assign. We will convert, starting from the left-most character, the letters of the ID into numbers.

This will give us a number from 0-9, which will work well if the assignment pool consists of 10 users or less. If we have between 11 and 99 users, we can also leverage the penultimate character in the record ID.
Now that we have two digits from 0-9, we can use a formula to concatenate them into a single number.
VALUE(TEXT({!for_character2}) & TEXT({!for_character1}))
So if our record ID is ‘00Q3z00001D4D0gEAF’, our randomly generated number will be 15. We will now assign this to our variable, ‘var_RandomNumber’. We will now use this variable in a formula that will be used as a baseline for identifying whether the record is ready to be assigned or not.
IF({!var_LoopNumber}>9,
VALUE(RIGHT(TEXT({!for_RandomNumber}),2)),
VALUE(RIGHT(TEXT({!for_RandomNumber}),1)))
This is to ensure that we are using the correct number of digits from our randomly generated number (00 is not equal to 0).
The next step in the Assignment Engine is the loop. We will loop through each user from our assignment pool and decide whether we will assign the record to this user or not, and we can achieve this by counting the number of loops we go through, starting with 0.

So if the last two digits of the ID are ‘Ao’, the formula will return 15. When we reach loop number 15, whoever that user is will become the owner of the record. In this specific example, should we have only 13 users in our assignment pool, we will exit the loop, pass through the re-enter loop element and restart the list of users. We will go through the loop two more times and then assign the lead.
Once this decision outcome has been reached, we will exit the Assignment Engine and return to the Launcher. Here, the record will be updated with the new owner and the process will be over.
Launching the Flow
To automate this process, we are leveraging the Mass Action Scheduler, which gives us the flexibility to determine the subset of leads we want to enter into the process and the frequency with which the process takes place.
Enhancements
This flow can be enhanced to leverage attribute-based assignment as well. By adding in new elements we can add further complexity. Ensure you have contingency in place in case certain records are not found.

Read More
Solving Business Challenges: Business Hours
Salesforce’s ‘Business Hour’ functionality has helped numerous companies better meet customer expectations by more accurately calculating and tracking progress against SLAs. This functionality is a giant step forward, particularly for long-time Salesforce users who previously had to wrestle with complex formulas to determine if a case was within SLA times. Unfortunately for one of our clients, unlocking those powerful calculations on custom objects still requires the use of Apex to call the Business Hours class.
Crunch Accounting strives for excellence in every aspect of their business, and one of their major goals was to better track against the SLA goals for their accounting team. As the accounting team managed their work through a custom ‘Accounting Services’ object, we knew we’d have to write some code – but we wanted to adhere to our low-code design principles and give them a flexible tool to use across their business as new problems arose. Instead of writing a trigger, we wrote an Invocable Apex Class that unlocks the Salesforce Business Hour functionality within Flow – making it accessible for any object and any use case.
To do this, we simply created a ‘Business Hours Request’ (BHR__c) sObject with a picklist for the method type, a picklist for the different Business Hours configurations and some inputs and output fields for each method. For example – for the ‘Add’ method we have an Input Date/Time, Input Number of Hours, Input Number of Milliseconds [formula field] and an Output Date/Time).
From there, we simply use a flow assignment to set the right values on a record variable which is passed to the Invocable Apex and is returned with the desired output – all without actually performing a DML statement. During bulk stress testing, this solution achieved similar (and in some cases faster) performance than applying the same logic in a trigger calling the Business Hours class. Now, Crunch or any other of our clients can leverage the Business Hours capability anywhere they like without writing a single line of new code.

This flow uses the invocable class to stamp three different SLA target thresholds onto a record. This allows Crunch to achieve greater visibility for how they achieve against their public SLA and against their increasing performance targets. These performance targets are made achievable through other efficiency gains through Salesforce. The flow works quickly, even when calculating all three targets for 200 records at a time.
Read More
Project Vita: Chapter 4 – Retrieving Data with a Scalable Sensor Solution
Instead, following MuleSoft’s three-tier architecture, we implemented a ‘Process API’ to act as our master node and deployed it to infrastructure within each ‘site’ (i.e. on the same subnet as an array of nodes – like an employee’s home or an office). This Process API simultaneously searches all nodes (System APIs) for the required sensor and retrieves the data before returning it to the client. This master node also enabled us to retrieve readings from all available sensors within the site simultaneously and aggregate the results into one single response. From a security point of view, it also meant we could restrict access to the System APIs and regulate inbound traffic to the site via a single point of entry.
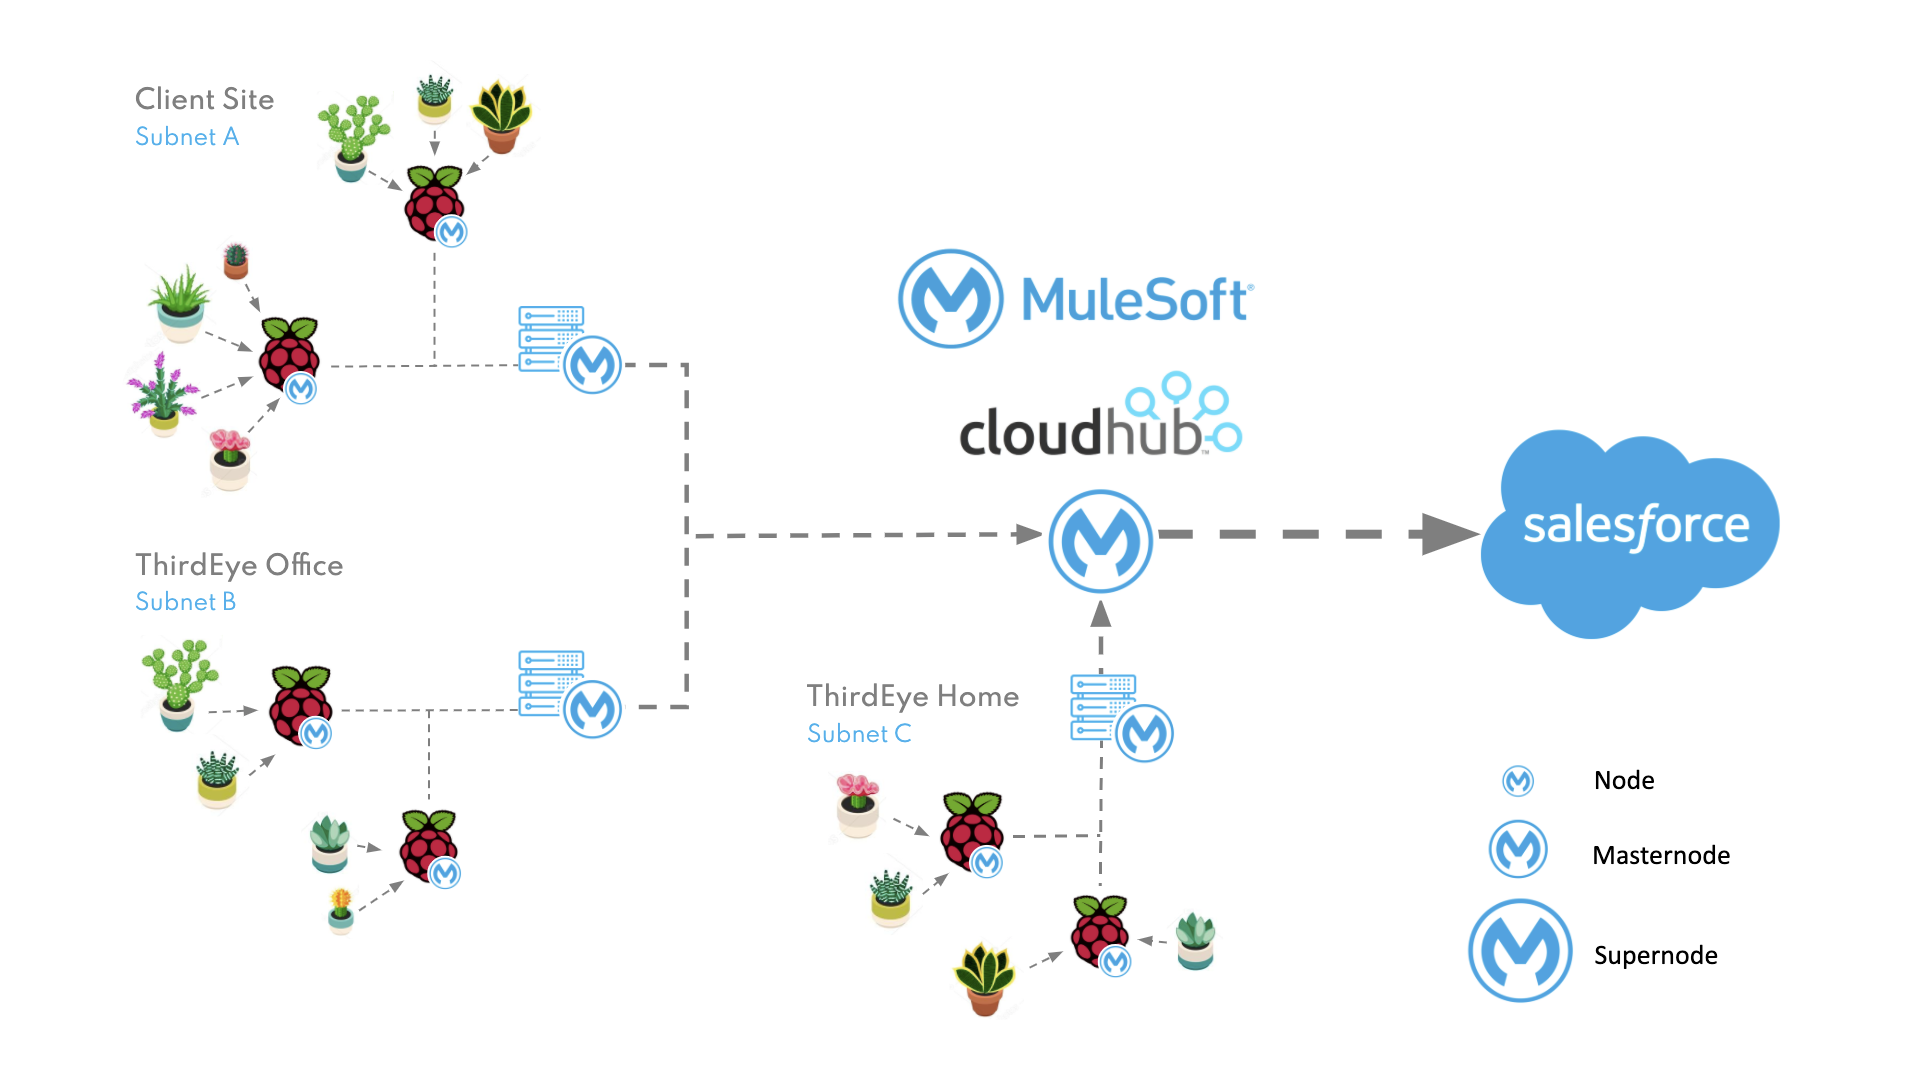
The next step was aggregating results between the different sites as we had multiple employees running nodes at home and planned to add additional nodes to each of our client’s offices. We were able to reuse our master node concept and add an additional tier within the process layer which would be deployed to CloudHub and act as our ‘super node’. This API could simultaneously call each of our master nodes and aggregate the results, or it could act as a single endpoint which would search and retrieve the data for any specific sensor within any site (globally).

Containerization of the Mule Runtime
As we were developing our solution remotely, with multiple team members configuring nodes across various sites, it became imperative that we had a consistent development environment, particularly when it came to troubleshooting or debugging.
We were using the on-premise Mule Runtime but hardware varied considerably with a combination of laptops, MacBooks, Raspberry Pis, and a HP ProLiant Microserver, each setup and configured by a different team member. This meant that when anything went wrong during development or deployment, it was proving difficult to isolate the issue despite it often being a simple developer oversight.
We decided to leverage Docker to containerise the Mule Runtime, which enabled us to run one quick command and automatically access the same environment regardless of the hardware in use. This provided a consistent backbone for all of our nodes and master nodes, but also reduced our initial node setup time from a couple of hours to literally minutes.
We had the beginnings of our Application Network with the master nodes and super node now deployed, and the data was being brought to life using Einstein Analytics, so we set upon finding the next integration challenge while the Salesforce team started looking at embedding Lighting Web Components and leveraging Field Service.

Project Vita’s chapters:
Read More
Project Vita: Chapter 3 – Choosing Scalable Salesforce Tools
Processing Platform Events
ThirdEye prides itself on being at the cutting edge of Salesforce’s new features and platform capabilities, and as such, has amended the processing of the platform events as recommended changes to the platform occurred:
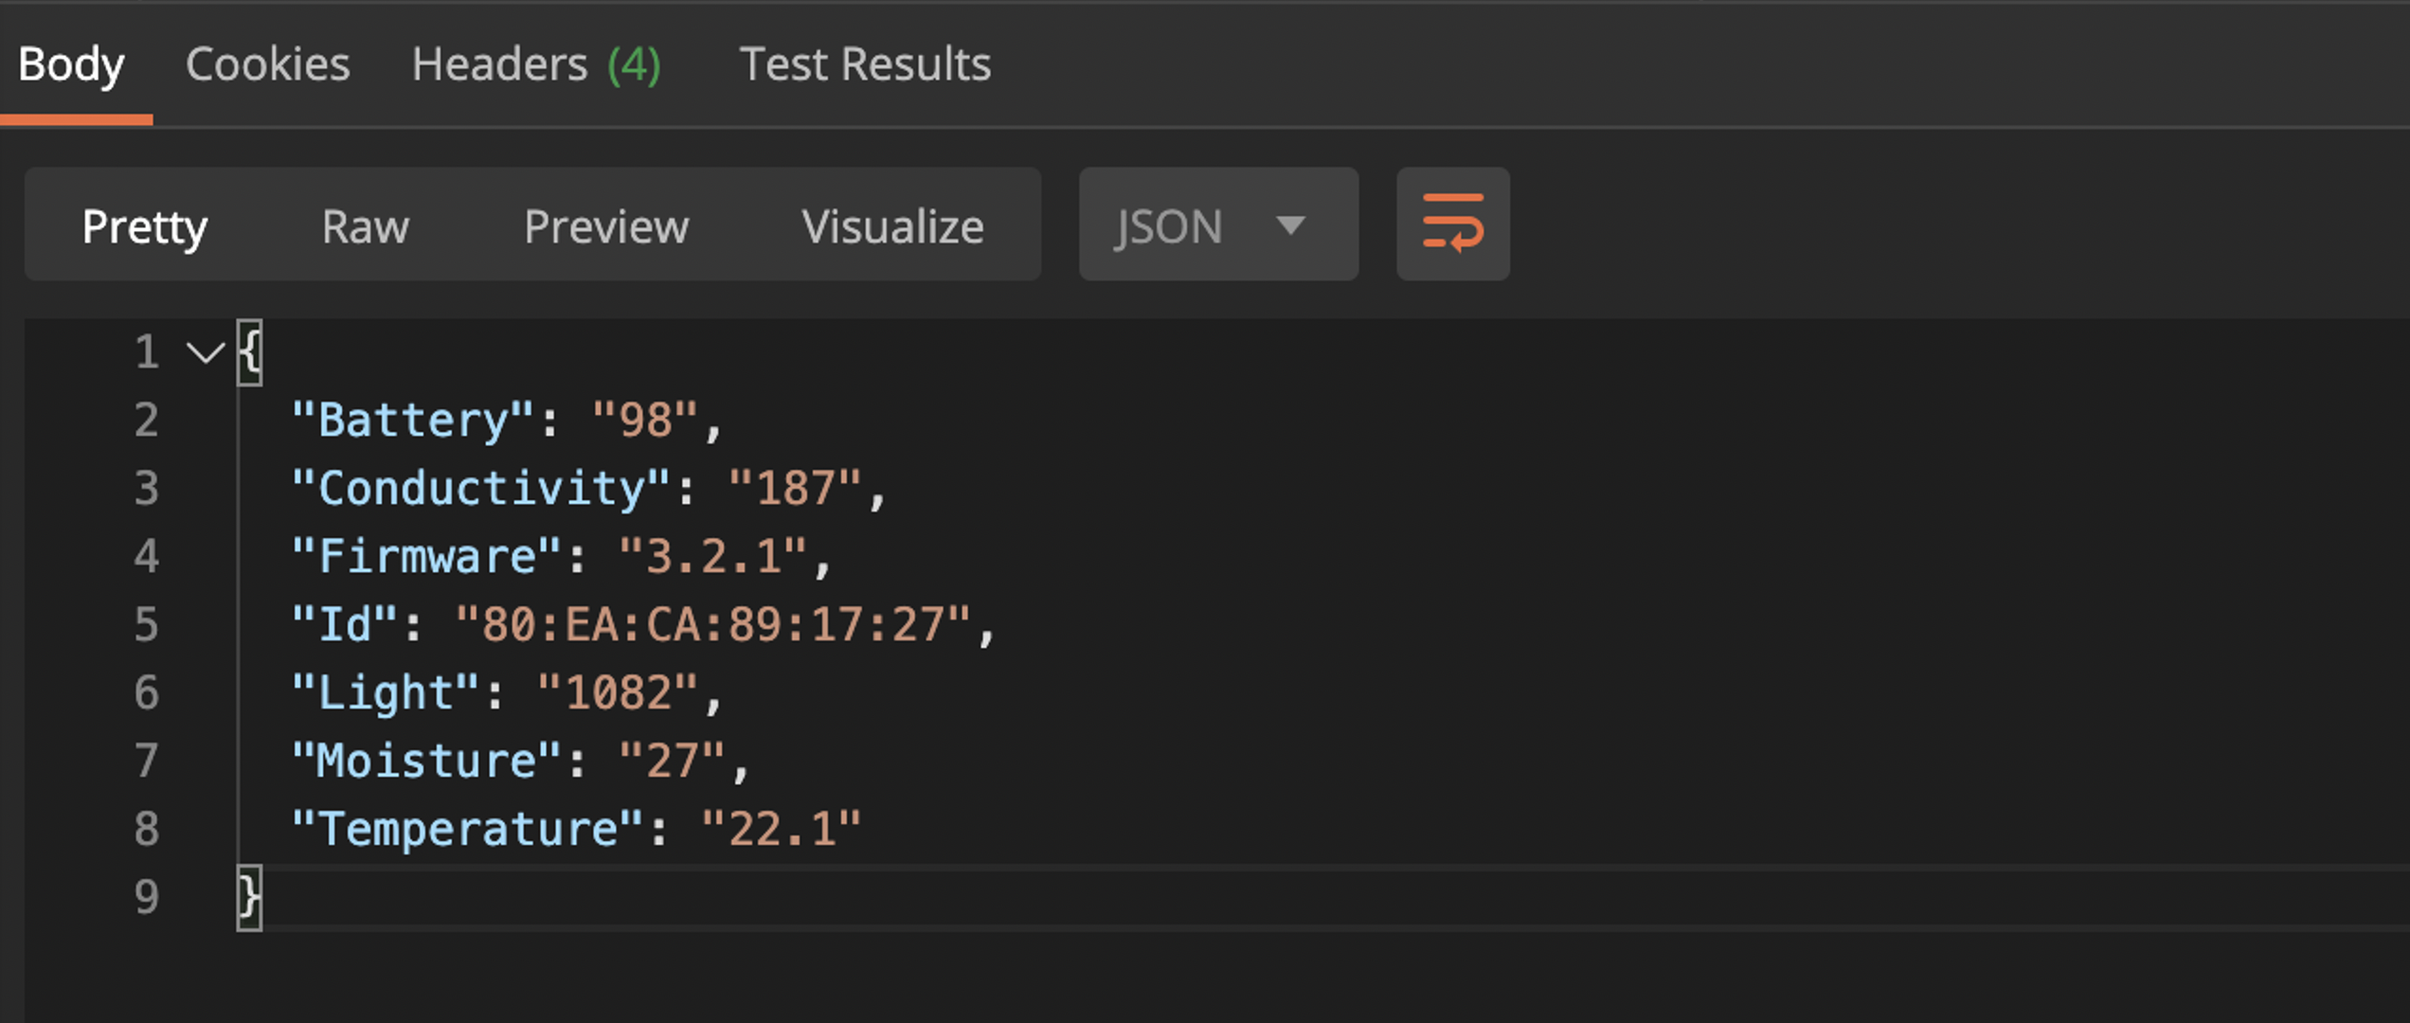
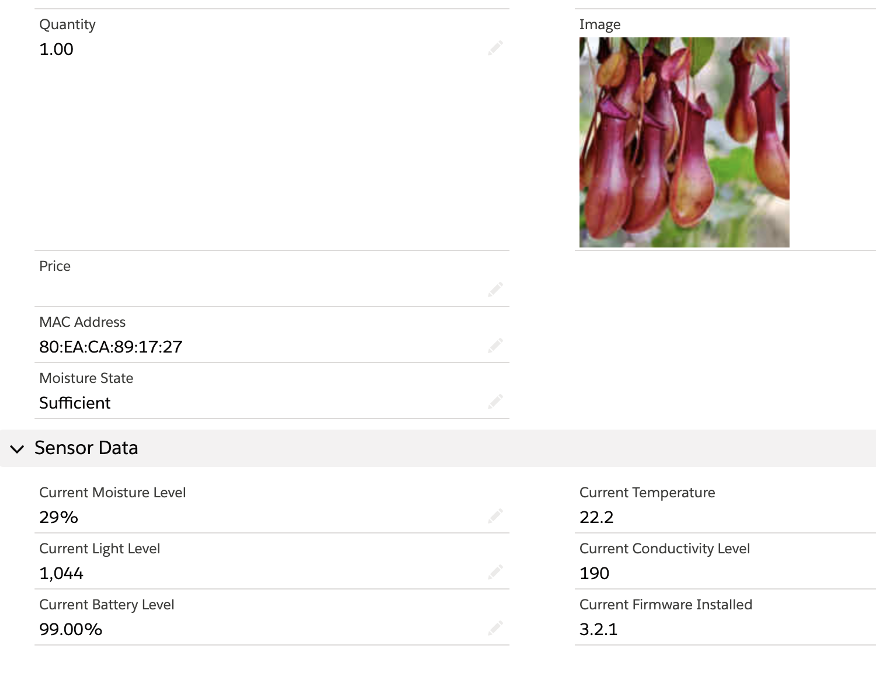
- ‘IoT MiFlora Context’ linked the Platform Event to the Asset object using the unique ‘MAC Address’ identifier
- ‘IoT Moisture Orchestration’ was created against the Context and served to set and retain the state of the asset’s moisture as each of the platform events were received. It also processed logic against the message and when the Moisture State changed, a case was automatically created.

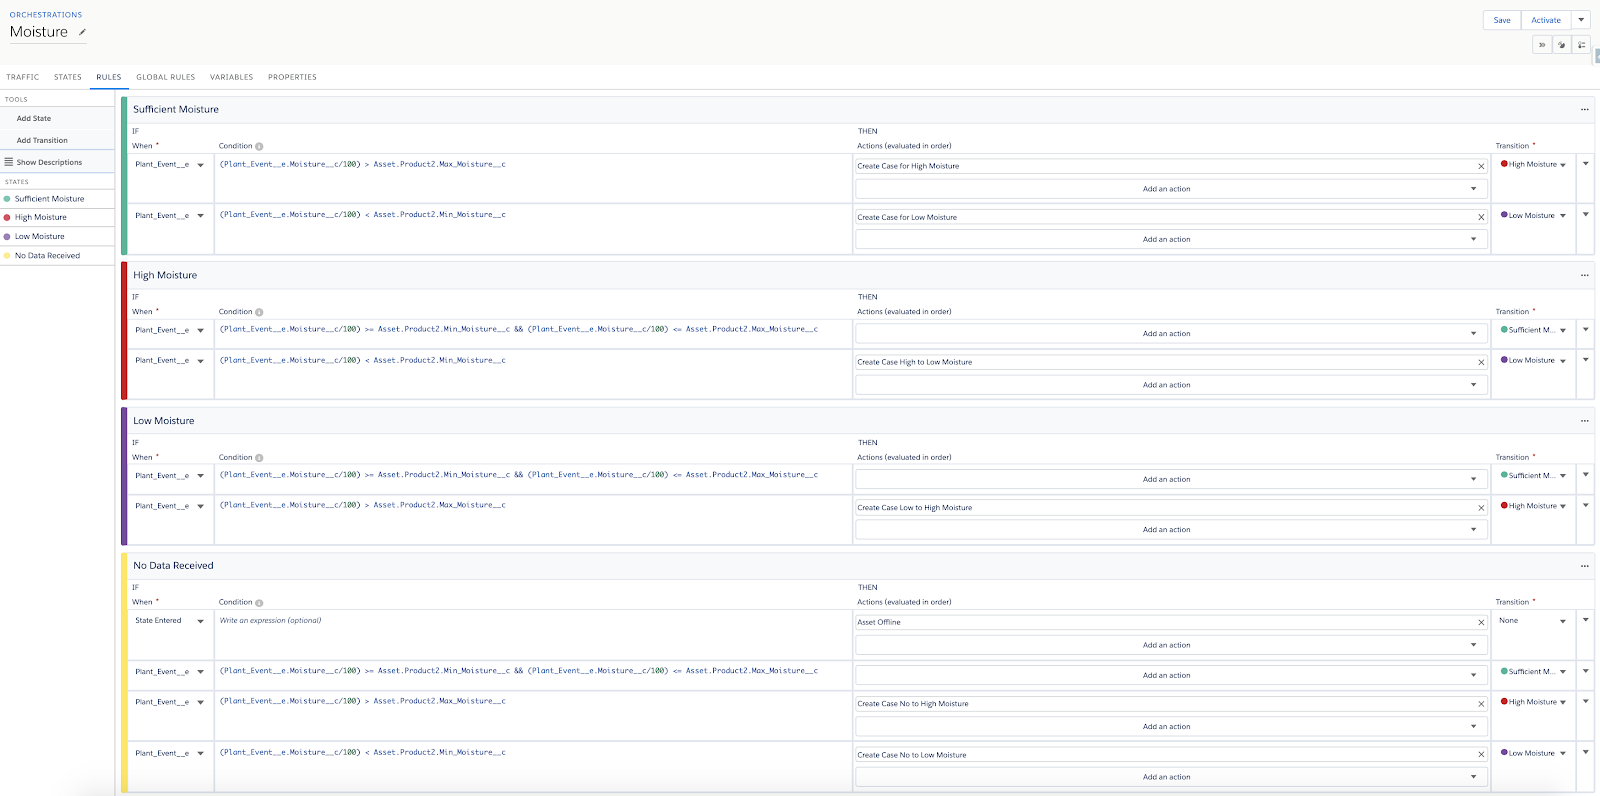
2. Process Builder + Flow Builder
Foreseeing the retirement of ‘Salesforce IoT’, we migrated the logic to Process Builder and Flow. The only structural addition we needed to make was to add and maintain the ‘Current Moisture State’ on the Asset Object:
- Process Builder listens for Plant_Event__e Platform Events, gathers related object information about the specific Plant, and passes this information to Flow for assessing the Moisture State.
- The Flow determines if the state has changed since the last event and creates a case if it has changed to ‘High’ or ‘Low’ Moisture. We also notify the plant’s owner to advise them of what action to take.
- Once the Moisture State has changed back to ‘Sufficient’, the Cases for the Asset are automatically closed.


We also have a scheduled Flow that determines if the last sensor reading was over a certain amount of time ago. If it is, the Asset is marked as ‘Offline’ and the plant’s owner is notified.
3. Flow Builder (Summer ‘20 Release)
Instead of using Process Builder as the listener for the platform event, the ‘Salesforce Summer ‘20’ release allows you to do all of this from one automation tool, Flow Builder!
Einstein Analytics & Historic Sensor Readings
It was all well and good getting the notifications that our plants were thirsty but we also wanted to be able to visualize the data and see it for ourselves.
So, for each of the processing automation above we also stored the readings as a record in a custom sObject object called ‘Asset Sensor History’.
After setting up an hourly incremental sync for the sObjects and Dataflow in ‘Einstein Analytics Data Manager’ for this historical data, we could use the resulting dataset to show on a Timeline chart. However, the question of scalability loomed over us again when calculating the timely depletion of sObject storage.
It was time for us to use a Big Object.
To make it configurable from the Setup UI, we created a Schedulable Batchable Apex Job that:
- Replicates the data in the the ‘Asset Sensor History Store’ Big Object from the subject
- Checks for successful replication
- Deletes successfully replicated sObject data
- Triggers ‘Einstein Analytics Data Manager’ to sync the SFDC_LOCAL Connector Big Object data
Now we had both of these in Analytics we created a scheduled ‘Recipe’ to merge, transform, and denormalize our data sources into the dataset that we now use for dashboards and analysis.

Project Vita’s chapters:
Read More
Project Vita: Chapter 2 - The Quest for Data
Tools Included

| Hardware: |
Software: |
- Plant Sensor
- Bluetooth Enabled Controller
|
- Mule 4.2.2 Runtime
- Salesforce
- Python 3
|
Different Approaches
The first challenge was identifying a feasible means of capturing plant data and narrowing down sensors that are compatible with a wider technological landscape (ie. not locked into a proprietary solution or product).
At our disposal we had a Raspberry Pi (compact and powerful single-board computer) which had multiple GPIO headers that all kinds of sensors could be connected to. On the market you can typically find two types of soil sensors: resistive and capacitive. The capacitive option was preferred since it has no exposed metal by design. Therefore, it was neither at risk of oxidation, nor corrosion unlike a resistive sensor.
One of the first sensors we experimented with was a capacitive moisture sensor from Adafruit called the STEMMA Soil Sensor, which once connected to a Pi, we were able use to get readings for soil moisture and temperature. We successfully leveraged this solution for two plants located side by side, but it quickly became evident that this was not scalable to the extent we required.
It was back to the drawing board to explore what other sensors were available on the market, where we identified a possible candidate created by XiaoMi: a wireless BLE (Bluetooth Low Energy) device which would provide us with readings for both moisture and temperature, as well as light exposure and soil fertility too.
Solution Architecture (v1)
After exploring a few different approaches and iterating through the most promising one, the solution uses IoT sensors, Raspberry Pis, MuleSoft, Python, and Salesforce.

A sensor is placed in each plant pot that monitors the ambient temperature, light exposure, moisture and soil fertility (measured as conductivity). Each Raspberry Pi is placed in a cluster of plants with the ability to scan for nearby sensors and retrieve individual plant data. This is made possible by leveraging Python code running on each Pi and deployed applications which send data to Salesforce at a set interval. These applications were built using MuleSoft – an integration and API platform for connecting applications, data and services.
Taking a deeper dive, we hosted our Mule applications on the Mule Runtime (4.2.2) to serve as a lightweight and scalable runtime engine. Following best practises such as modularization, concise documentation in READMEs and promoting consumption, we developed two applications to take care of our integration requirements:
- System API – leverages the Python application on the backend and transforms the payload in accordance with our API contract (API RAML Specification).
- IoT Batch Scheduler – calls various endpoints of the Mule System API, for example scanning for local devices and retrieving data. This means that in a cluster of plants or in a set location, one Raspberry Pi can be used to retrieve readings from any number of devices within range. Then the batch scheduler application sends the data to Salesforce at a user defined frequency.
In summary, each Pi runs three applications: one Python application and two Mule applications. The sequence diagram illustrates how these three applications interact and how data is sent to Salesforce as a Plant Event.

As a final step, we added automation and in-built resiliency where possible to ensure our solution is easily consumable, robust and scalable. For example, each Pi has a Cron job that pulls the latest source code from our git repository, compiles the applications, and automatically redeploys on reboot in the case that there is a power outage or if applications need to be updated.
Now that we have our plant data successfully feeding into Salesforce, stay tuned next week to see how we are leveraging the power of Salesforce IoT Orchestration to bring the data to life!
Project Vita’s chapters:
Read More
Project Vita: Chapter 1 - Will Your Desk Plant Survive Covid-19?
Amid the business chaos of adjusting to working during a global pandemic, our dozens of plants were suddenly deprived of their normal caretakers that are in-tune with their watering and care needs. Instead, they were left in the hapless blackthumbed hands of yours truly. While I tried my best for the first couple weeks to ensure that each plant was watered regularly – I soon learned that a one-size fits all approach to plant watering combined with less regulated office temperatures was not faring well for our flora friends. With nobody knowing when we might be able to return to our offices as normal, the team was all very concerned for the wellbeing of their plants, and as we’re reading in the news, we were not alone with this concern.
We had our business problem. We needed a way to better monitor the state of our potted pals, and figure out how we can enable someone that is clueless about plant care (me) to give these plants the love and care they require. Now, after brainstorming with the talented tech team at ThirdEye, we have our solution, Project Vita.
With Project Vita, we will solve the plant problem the way we know best – by putting to use market leading technologies. Each plant will be equipped with a wireless sensor that feeds data to a Raspberry Pi, at which point Mulesoft will take regularly scheduled and instant reads of plant data and feed it into the Salesforce IoT Orchestration. From there, we will be using Salesforce Service Cloud to raise cases when our plants fall below the moisture threshold for the plant species as well as alert us if sunlight or temperature conditions are not optimal. Einstein Analytics will give us insights from the history of sensor readings – and that is just the start.
While we realize this is a somewhat frivolous application of technology, Project Vita will serve as a fully functional demonstration on how IoT Orchestration can be combined with the already powerful features of their Salesforce technology stack in a way that will help them solve problems preventively and with greater accuracy. As we go down this journey, we will be sharing regular project updates, success stories and horror stories. Welcome to Project Vita, we hope you will follow it with us and we would love to hear your ideas!
Project Vita’s chapters:
Read More